Chicken Chayote, Canned.
Ingredients
3-4 lbs boneless skinless chicken thighs
10 cloves garlic
1 inch piece of fresh ginger sliced into matchstick slivers
1 small white onion
5 chayote peeled and sliced - if you can't find chayote substitute zuchinni or yellow squash
2 Tbsp soysauce
1 Tbsp oyster sauce
1 tsp red chili flakes
1 TbSP sea salt
2 cups water
3 tbsp oil
HOT wok!
prep the chicken by removing as much fat as possible
prep the garlic, ginger and onion.
heat the pan very HOT until it's almost smoking
add oil, chili flakes and garlic and keep it moving
add ginger once garlic is dancing in the oil
add onion once garlic is golden
Once the onions are transluscent add the chicken.
Season with salt and keep it moving
When chicken is done - season with soy and oyster Sauce...
When everything bubbles and pops - add water.
I wish I would have just cooked the chicken through and warmed the veggies throughout and then canned it because it makes for a really soft product. But it's a learning curve - and better to make errors on cheap things - rather than when things are REALLY tight.
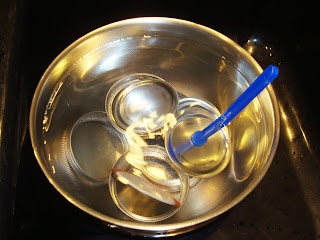
I washed the jars lids and caps.
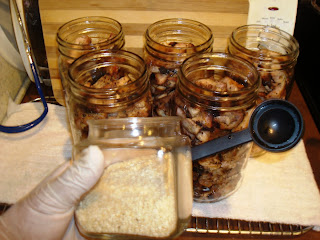
Level with boiling water to 1 inch mark.
Wipe, put on lid and process in the pressure canner.
Hindsight is a mother...like i said next time I won't cook the veggies at all.
But at least we have 2 quarts of eats to go with rice.
Contact Me By Clicking "view my complete profile"
Thursday, March 31, 2011
Chicken Teriyaki CANNED. yup. CANNED
Teriyaki Chicken for Canning.
If you scratch the process of canning - you can just eat as is. But sine we love that Asian Flavor we have incorporated it into our food stores. We chanced upon boneless skinless thighs (99cents a lb) and in my opinion thighs are better for sauced or grilled recipes because it is dark meat. I decided to try half into chicken teriyaki and the other half into saute (that's another blog - Chayote Chicken). For over a decade I've been making my own teriyaki sauce so increasing it is no big deal.
This makes 5 quarts and leaves about a bowl for you to eat :)
Ingredients:
Boneless Chicken - 12-13 lbs
season with salt pepper paprika and garlic powder.
grill and set aside covered so it rests
Teriyaki Sauce
2 cups soy sauce
10 cups water
2 Tbsp ground ginger - or 4 Tbsp fresh chopped ginger
2 tsp garlic powder
3 c brown sugar
1/2 c honey
4 Tbsp black pepper
I simmered it the night before and let it rest so it could mature a bit. I adjusted it a bit with some pepper and soysauce until it had the zip i like.
Mr. Man grilled the chicken on mesquite the night before - I just left it in the dutch oval and left it in the fridge.
Simmer your teriyaki "sauce" and start to chop the chicken. I do this so I get everything super hot because when I first started canning (and i AM still learning) i would leave the jars and water too cold and some of my seals failed. Chop the chicken in hefty strips. Put back in pot and set aside. Now you ask why did you grill it if you are going to can it. 1) I wanted to give the chicken some strength so when we eat it later it will have a good bite. 2) That smoky mesquite flavor tastes good.
Now wash your jars and such
I set the lids and caps in HOT water. At this point I also fill the pressure canner with hot water and leave it on high.
Fill the bottles with the chopped chicken to the 1 inch level.
Once it looks like 1 inch top each bottle with 1 teaspoon roasted sesame seeds
Then divide the teriyaki "sauce" evenly between the 5 bottles. With the sauce that I made it came to about 2 inches from the top. Then run a plastic spatula down the sides to burp the airbubbles and push the center a bit to level it - but don't overstuff it.
So I bet you are asking why didn't I make enough sauce to go to the 1 inch mark. Well because the sauce will require thickening at the time you eat it. You'll see where this is going.
So then fill the jars to 1 inch with boiling hot water and nudge it down 1 more time with the rubber spatula to make sure there are no gaps and spaces.
I take a paper towel and wet it with water and a bit of vinegar.
Wipe off the sides rotating your paper towel around.
They look pretty promising. I think it would be safe to say this could feed 3-4 adults.
I pop the jars into the pressure canner and use the same timing and pressure as stew or soup.
According to the book for us it's 1hr 15min at 10lbs of pressure.
I am waiting for the processing to finish while I write.
Let's address the issue of thickening the sauce once you eat it.
Here's how you do it.
Open Canned Teriyaki Chicken.
Drain Chicken RESERVING liquid from mason jar
Heat Chicken gently since it will be pretty soft.
Make a Slurry - 1 tbsp cornstarch and about 1/4 cup water
Mix very well by whisk or hand
Boil the teriyaki "sauce" from the canned chicken.
Whisk in the Slurry and mix hard until it is shiny and clear.
It should have the same texture as a ham glaze.
Top hot rice with Chicken and then spoon teriyaki glaze over the chicken.
Top with green onions and veggies.
It's pretty easy. Just futz with the recipe a bit to get what you want.
Oh, and email me if you have any questions.
Labels:
canning,
chicken teriyaki,
food storage,
home made,
prepping
Wednesday, March 30, 2011
End Of March Haul....Be Popeye!
So it's the end of the month...last haul!
I hit the store this morning mainly to pick up some chayote and chicken. Chayote is a vegetable pear - and pretty much absorbs any flavor you put it with in a saute.
The overall price was 34.80 for 40+lbs of stuff.
Foil (20 ft) was only 68 cents
Light Red Kidney Beans - 98 cents a lb
New Star Spinach (6 oz) - 99cents a bag
Nestle semi sweet morsels (8oz) - 95 cents
Truly - the Chocolate was the best deal. Understand that bags of chocolate run at about 3.49 a bag for 15oz. These ones I picked up are marketed as a "topping" but are the same exact chocolate that they sell in the baking section. They are mini morsels - but I like these in waffles, pancakes, choco chip cookies and brownies. Score - and I will be hitting up their sister stores to get more of them to send overseas and to stock up.
This pasta is in 7 oz pkgs but they were 6 packages for 1 buck. The spinach is something we eat daily and I also dehydrate it.
The cucumber (6 for 96 cents) is dried into chips (the 2 moms love it), the boneless skinless chicken was 99 cents a lb - i will can this into ginger chayote chicken, and can the other part of the chicken into teriyaki chicken - non thickened and when you eat and heat it you just thicken with cornstarch and serve over rice. The chayote was 5 for $1
So Popeye said eat spinach it makes you strong. We added spinach to our preps -- just dry it with the stem tucked under the leaf because the stems take a bit longer to dry. One 6 oz bag dries to about half an oz in weight and will fit in a sandwhich bag. How do we use it? You can reconstitute the spinach and make it into creamed spinach. You can just throw some on a cup of noodles or nong shim bowl for extra flavor and vitamins. You can crumble it over your rice or pasta dishes. Sure it's about flavor - but it's also about nutrition. Plus I prefer the flavor of the dehydrated versus the canned spinach.
More to come in my next blog with CANNING MY CHICKEN THIGHS!
Sunday, March 27, 2011
Preppers Paella
Paella is basically spanish rice The traditional way is to make it is to saute all the ingredients add the liquid arrange the seafood on top and then let it simmer until done. No peekaboo cooking - and no being wimpy. See below - it's so pretty right? Well, it ain't happening if SHTF... Here's how I make mine below...and there is sausage and chicken in there you just can't see it. I also add peas and carrots. But it's good and you can make it out of your preps This is supposed to serve 10 but it easily serves 12 Preppers Paella Reconstitute your ingredients... 1/2 c olive oil 4 chicken breasts - cubed 1 sausage - sliced into small rounds or cubed 2 lb shrimp (20-30 pcs) - cleaned and deveined (my preference) 4 cups white rice 2 cups water (but add water as you go if you smell it is a bit roasted) (brown rice sub is 3 cups brown rice 6 cups water) 5 cloves garlic, chopped 1/2 onion, minced 1 tsp oregano 1/2 tsp turmeric 1/4 tsp dried thme 1 tsp saffron salt and pepper to taste 1 c tomato 1 c cream (1c reconstituted dry milk + 1/4 c butter) *or you can use 1 can of condensed tomato soup in place of tomato and cream* 1 large green bell pepper 1 large red bell pepper 1 cup peas, dehydrated ok 1 cup carrots, dehydrated ok optional 1 cup spanish olives (canned) 1/2 cup canned green chilies (or pickled chilies) 1/2 c onion --- Heat the oil in pan (med high), saute garlic until golden brown. Add Chicken and brown on all sides, add onions and cook until clear. Add Sausage and all herbs, and saute it all together. Add Rice and brown rice a bit Add Shrimp and Bellpepper, saute further If it isn't golden yellow add more Saffron. Add cream & Tomato or condensed tomato soup and stir thoroughly Add green and red bellpepper, stir Add Chilis and olives, stir Add the remaining water, Sprinkle with Carrots and Peas cover with lid Raise the heat as high as it will go and leave high until liquid bubbles HARD. Then turn down heat as low as it will go Leave undisturbed for 25 minutes or until rice is done. Enjoy. The spanish version has mussels and langoustine. If you are inclined and have the preps - I would just top it with canned mussels before serving with a bit of lemon and green onion right before serving!
Saturday, March 26, 2011
Effin' Cool...
You know what's cool? When you meet like minded people who have an excess of stuff - and say,"Sure email me your address and I'd be glad to send you some..." And even though people offer me free stuff I always offer to pay or trade. So this week I will send back cookies, preserves and dehydrated food. But that's how we got 8 (yeah EIGHT) Alice packs in the mail today...FaaaanTastic...
Ghetto Garden Update - week 4, March
Ghetto Garden Update - wk 4 march.
So I took a look at them last night - and some of the pots had 4-6 plants per pot and decided that today I would have to split them up and let them get bigger before I move them to buckets. I don't even know if this is how you are supposed to do it - but i'm doing it this way because I need them to be strong before I move them to their final destination.
Keep in Mind I've never had anything other than houseplants.
The yellowbeans are looking good in this terracotta pot that I moved them too so I'm just letting them get bigger - they aren't doing as well as the guys in the plastic plants and they are older but at least they are still here. I killed the first batch that I tried to germinate inside by drowning them. So it's a real struggle not to keep watering them - instead I mist them to get that watering urge out of my system
The ones below I split into 2 pots since they were had a lot less roots - I guess i'll just keep the best looking ones and get the beans from those.
The butternut squash had 3 seedlings crowded into one so I split them into individual pots and buried them to the neck to force more roots to come out from the stems. Yay butternut squash.
The cucumber were growing 4-5 per pot..so I put them together in this triple planter. I was hesitant to just kill off any of them since they are so small and I have no idea how to pick which I will move to buckets - i might just move them all. Who knows. I will ask the seasoned ladies in the room and work it out.
I left the transplanted ones closer to the pool where the sun was hitting and it was warmer...Um - and you turn your back for one second...
And "someone" will bite off some of the leaves!
Bad GIRL! She already yanked the bean seedlings and drug them across the yard last week - but as you can see they made it. Crazy doggie!
So this is pretty fun - and a small investment of my time - a few minutes a day. It's also part of prepping - because you can't live off of stored food forever and you must at least learn to grow something. There are a LOT of people out there buying 'survival seeds' who have no idea how to grow them - or who don't even have any dirt or fertilizer or compost or pots. The dirt, fertilizer and pots are crucial here in the desert because you can't just plant stuff in your yard and it works out - it takes some creativity around here. Even if i just get good at cucumber and beans - I can always trade with someone who is good at tomatoes and potatoes know what I mean?
Try it, keep at it, Keep Prepping!
Labels:
beans,
cucumber,
ghetto garden,
prepping,
squash
Friday, March 25, 2011
My Walgreens Hustle...
Okay so basically we have a Walgreens down the street and we go there to pick up meds and snacks or whatever en route to school or work. A couple months ago - I looked through their ads and thought hey I could use some of this stuff. Well around the same time I went to purchase some feminine products from another store b/c I had a raincheck and the girl said oh if you buy this Colgate today you get 100% back to use towards something else.
Well this is nothing new - I've heard people talk about this in various prepper blogs and never really thought about it until the girl mentioned the toothpaste. This is the other thing - it is not applicable towards alcohol or cigarettes but if the cashier knows you she usually lets you slide. I know of 3 people at my store who will let me slide and that is the time I adjust my purchases to include Beer.
I was discussing this with Trunz and it seems a bit confusing how I get my deals. So I stopped by the Walgreens after my 7am class since I had spied some Salmon I wanted to buy.
First step is scan the ads for the phrase below REGISTER REWARDS...sometimes they are not very good - but generally i look for the cost to be 99cents to 0 cents. Today I happen to find something (hand soap) that we don't really keep in storage but would never hurt to have a couple.
The second step is to find something that is a real STEAL. I found these large cans of Salmon on sale for $1.49 with coupon. At Walgreens the regular on these is like 3.79 and at other stores the average price for these is 2.99. Of course it is limit 3 but the expiration is JULY 2015 yay.
The 3rd step is to check any other little coupons that you might want/need to store. I spied gloves at 2/$1. I have used these before - don't buy a ton if you haven't used them before. They work really well for the price and do not tear when you wash dishes or scrub. So I add a couple of these to the list since I already have like 6 at home.
So you say - what if there are no coupons that you like - what will you do with the rebate?
Well Walgreens has peroxide regular price 2 for $1 and Epsom salt 4lbs for $2...or you can browse the store and find something at a low price to add to your preps - even if it's just candy bars. Whatever the case you can spend it or use it within 2 weeks.
So below is my total take. 10 items = $12.81 , average price per item is $1.28. Which doesn't seem very inexpensive until you take into account that it's 6 cans of salmon.
So I bring my little basket to the register and tell the girl,"I'm going to have these rung up separately..." She said okay no problem.
The first purchase was actually the soap with rebate and gloves with coupon.
First receipt is $4.37 (our tax is 9,8% in our neighborhood), and it loads me with a $2 coupon.
My second purchase is 3 cans of salmon with coupon and $2 rebate.
Total paid is $2.58
My 3rd purchase is soap with rebate $3.28 which again gives me a $2 coupon.
My last purchase is salmon with another coupon and paid with rebate - $2.58
Now...this seems like a LOT of work - but it isn't - all you have to do is pay attention. If I would have bought all of this it should have been $31.50 including tax. But what I paid was $12.81. I normally get a much better deal as my things average about .45-.60 cents a piece, but today the item was Salmon and I have no regret at all because we needed a bit of it in our stores.
The other thing is that some weeks they have a special INSERT in their weekly ad (by the front registers when you enter) and it usually has 6-8 items with Register rewards - always look for that hee hee.
Happy Shopping and Keep Prepping.
Thursday, March 24, 2011
I'm counting on It...Taking Inventory
So...My 2 Moms are in town (Biological Momma (bmom) and GodMomma (gmom)) and they run the show - truth be told they are just very mellow creatures who like the simple things in life and hanging out with us. They are also the miniature Rambo's of thrift shopping. I really didn't know how they would take all of this prepping stuff. B Mom kind of chuckled at the sight of the dehydrator and canning stuff...I'm really not gonna bicker with her about it because I can't waste any energy on anything but school and prepping. My Gmom has an old sister who is into canning - the Nuns in her schools were American and they regularly canned things to give to the poor or just to store, so my Gmom said oh if your Mommy P was around she would love all of this - I will bring her marmalade and veggies you make.
About 2 days later they asked me about the food stuff again - and I showed them the price of things through the ads and pointed out that generally speaking the price of butter mirrors gas...meat is usually 2 dollars more than gas...and milk is 2 dollars less. They agreed that all that was true even if they never used that as a price gauge. I told them gas has been increasing about 7-10 cents a week and LA is already at 4.29 right now. I said when gas is 5-7 dollars how much will food be? That finally quelched it.
I've been really perturbed by the Japan disaster, the Libya Farce and other goings on and I feel this urgency to prep harder and harder and harder. I really have to rein it in when I am out shopping. I try to stay at the price points I've set for myself.
I've also been forgetting to add in preps that are given to me coffee, macadamia, ceramic knives, ginger tea, kona coffee, dried mango, coconut oil etc...I really need to get on top of it and start tracking stuff. I'm so lucky that I get preps from overseas that cost a ton here.
So last night I did most of the asparagus canning style - so 12 quarts...and there was one bottle left of the candied orange peel so i threw it in there. I know that they aren't as good as fresh
but if SHTF - we've got 17lbs of asparagus available to eat.
I am also dehydrating 7 lbs of the asparagus for storage...because I've done micro asparagus and it stored and rehydrated very well...so Yay for us.
Gardening attempt Part 2...
My life coach Mushroom whom i met in a chat, really helped me figured out some basic issues that I know nothing about with over watering, underexposure to sun etc. She put also clued me in on what to plant when. Thank You Madame Mushroom! I water from the bottom to avoid drowning the poor little guys.
The squash is short and fat...and it is what I found in the bucket I'd tossed as dead plants.
The cucumber and yellow beans seem to like it outside. It was highs of 93 last week but this week it dropped to 67 in the day and 50's at night and i tell you what these little seedlings sure look happy. I've never grown anything from seeds before!
I can't wait til these squash come in - it's butternut - so i'm going to fry them like chips
Here's my beans - that's just from 4 beans yipee...time to move them and bury them deeper. and move them to buckets soon - i don't have much dirt - i have to go see the compost lady soon.
This is all very new to me - but we're just gonna Keep On Preppin!
About 2 days later they asked me about the food stuff again - and I showed them the price of things through the ads and pointed out that generally speaking the price of butter mirrors gas...meat is usually 2 dollars more than gas...and milk is 2 dollars less. They agreed that all that was true even if they never used that as a price gauge. I told them gas has been increasing about 7-10 cents a week and LA is already at 4.29 right now. I said when gas is 5-7 dollars how much will food be? That finally quelched it.
I've been really perturbed by the Japan disaster, the Libya Farce and other goings on and I feel this urgency to prep harder and harder and harder. I really have to rein it in when I am out shopping. I try to stay at the price points I've set for myself.
I've also been forgetting to add in preps that are given to me coffee, macadamia, ceramic knives, ginger tea, kona coffee, dried mango, coconut oil etc...I really need to get on top of it and start tracking stuff. I'm so lucky that I get preps from overseas that cost a ton here.
So last night I did most of the asparagus canning style - so 12 quarts...and there was one bottle left of the candied orange peel so i threw it in there. I know that they aren't as good as fresh
but if SHTF - we've got 17lbs of asparagus available to eat.
I am also dehydrating 7 lbs of the asparagus for storage...because I've done micro asparagus and it stored and rehydrated very well...so Yay for us.
Gardening attempt Part 2...
My life coach Mushroom whom i met in a chat, really helped me figured out some basic issues that I know nothing about with over watering, underexposure to sun etc. She put also clued me in on what to plant when. Thank You Madame Mushroom! I water from the bottom to avoid drowning the poor little guys.
The squash is short and fat...and it is what I found in the bucket I'd tossed as dead plants.
The cucumber and yellow beans seem to like it outside. It was highs of 93 last week but this week it dropped to 67 in the day and 50's at night and i tell you what these little seedlings sure look happy. I've never grown anything from seeds before!
I can't wait til these squash come in - it's butternut - so i'm going to fry them like chips
Here's my beans - that's just from 4 beans yipee...time to move them and bury them deeper. and move them to buckets soon - i don't have much dirt - i have to go see the compost lady soon.
This is all very new to me - but we're just gonna Keep On Preppin!
Subscribe to:
Posts (Atom)